
HA Traefik Failure

ยท 2 min read

My Traefik Proxy has been running quite well over the last several weeks, providing encrypted, load-balanced forwarding to services running in my Docker Cluster and Homelab. Well, until recently. Yesterday I decided to perform some maintenance on one of the services running in my cluster nodes. I updated a dependency that ended up taking one of nodes offline. No problem I thought, Swarm should detect the node being offline and spin up the services on other nodes. And it did just that, as expected. However, I was still getting lots of alerts from Uptime Kuma. Services were going up and down like crazy.

After a little more digging, I realized the problem. While the cluster was adapting quite nicely, my Traefik proxy was still attempting to load-balance to all nodes in the cluster, including the unhealthy node. Embarassingly, I realized I made a complete oversight in the design in not anticipating this being a possibility. And, Traefik has a simple solution to address this: Health Check.

Traefik Health Check

Health Check periodically checks each server listed under a service and verifies that it is healthy. If it is unhealthy, it is removed from the load balancing rotation. A very simple solution that I fixed with an extra parameter in my dynamic configuration. I hope my HA homelab is now a little more HA. ๐Ÿ˜…

Traefik Proxy for Docker Swarm Cluster

ยท 5 min read

There are many challenges and problems to solve for when setting up and running my Homelab. After the infrastructure was setup and the cluster was configured, I started running various services and applications. Initally, most of my services have been focused on running operations (Observability, Container Orchestration, DNS, etc). Once these were stable, I started moving on to end-user applications. Regardless of service type, they all have a common set of needs. I quickly found that I needed a solution for accessing services via friendly URL, routing of all the various ports and IPs they run on, and serving them with a legitimate TLS certificate. A reverse proxy was clearly the next service I needed to put in place.

Traefik

I chose to use Traefik as my homelab reverse proxy. It's mature, well-documented, and relatively simple service to setup. It's also a preferred choice for serving K8s, Swarm, or other cluster setups. It provides routing, load balancing, service discovery, and TLS certificates ticking all of the boxes that I had on my requirements list.

While you can deploy Traefik directly into a Docker Swarm, I instead to deployed it in a standalone Docker VM on my Proxmox Cluster. The rationale for this is that I can still keep a single static IP for the proxy for the purposes of local DNS. Also, the VM is replicated and can be migrated or fail over to other nodes in my cluster as a high-availability setup. The Swarm has multiple IP addresses and while I could technically point the DNS record at one of those (due to Swarm's internal load balancing), I chose not to. This gives me the option of taking one or more of those Swarm nodes offline without having to potentially update DNS. There are some options for putting another load balancer in front of Traefik running multiple instances in the cluster but this seemed overkill and too complex for my situation.

I also have other services that sit outside of the Swarm cluster either as a standalone Proxmox LxC/VM or external service hosted else where on my network. Some of these services include a Tailscale Subnet Router, TrueNAS, Unifi Control Plane, and even my Brother laser jet printer. Once the pattern was setup, I found it quite easy and nice setup all services in the same way.

Traefik Architecture Diagram

I won't go into all the details of the configuration as most of this is well-documented across the Internet. However, I will highlight some basic design choices I made:

  • Pihole serves as my local DNS. I have an A Record here for home.ryanknopp.com that points to the IP address of the Traefik VM. All services have CNAME records at a subdomain of subdomain.home.ryanknopp.com which point to home.ryanknopp.com. The CNAME approach allows me to change the IP of Traefik in the future on one record instead of every subdomain if I need to. I also have multiple instances of Pihole for redundancy and synced via Nebula.
  • Traefik is hosted on dedicated VM in Docker. The service is configured to pull static and dynamic configuration files from a mounted NFS share on my NAS. The dynamic configuration file is where I setup my service HTTP routers and load balancers to proxy requests to either the Swarm cluster IPs or a single service IP. This is also where ports are mapped from whatever the service is running to standard 80/443.
  • I am currently not using Traefik-specific Docker labels for automated discovery. This proved to be a bit a challenge given that the proxy is not on cluster. Also, I believe I needed to extend a network across all of the services. I find it's not that much work to edit the dynamic configuration file each time I want to add/remove/modify a service.
  • Traefik connects to Cloudflare to validate DNS ownership of ryanknopp.com and then uses ACME and LetsEncrypt to create a TLS wildcard certificate that is used by the various services' subdomains and terminated at the proxy. This is stored in a JSON file also on my NFS share and mounted to the Traefik container.

Overall, I'm happy the performance and setup of this solution. As I scale this up and learn more about capabilties and limitations, I'm sure I'll evolve the design. For now, I'm trying to keep this simple and functional. Please find a couple references that I found extremely valuable to making this work.

2.5 Gbe in a Dell Wyse 5070

ยท 4 min read

I have four Dell Wyse 5070 Thin Clients in my Homelab. Over the last couple months, I have made a few modifications to make them more capable as compute nodes in my Proxmox cluster. This includes upgrading the RAM to 16 GB (from 8 GB) and swapping the standard 32 GB SSD for 256 GB units. With a low-power 4 core CPU and the whole system being passively cooled, this is a modest, but efficient and capable little compute unit.

Given that I use a 2.5 Gbe switch for the cluster, I wanted to find a way to see if I could upgrade the standard Gbe built-in NIC. This will help speed up tasks like backups, replications, and quicker failover during HA events. Also, I have containers running my Tailscale subnet router so I'd like to be able to fully utilize my 2 Gb fiber connection to serve my remote devices. The Wyse unit is quite compact and is very limited on expansion outside something like USB peripherals. However, mine do have an unused M.2 A+E Key slot reserved typically for a Wifi card. And, it should have the PCIe bandwidth to support the networking throughput I'm looking for.

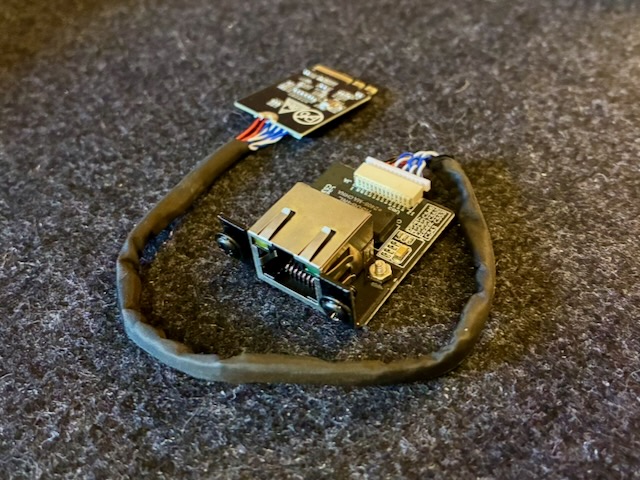
I began looking for ethernet hardware that can leverage the extra M.2 slot and stumbled upon a few different options. Ultimately, what I landed on was a youyeetoo 2.5G Ethernet Card. It is designed to fit into the an M.2 A+E slot and provide a mountable port somewhere else on a PC chassis. What I liked about this adapter is that it utilized an Intel i226-V chipset which will be excellent for compatibility and performance. The i225 chipsets have historically had a lot of issues, but from my research it seems Intel resolved a lot of that in the i226. Also, the adapter comes in different cable lengths and the 20 cm option fit well within the Wyse chassis.

youyeetoo 2.5 Gbe NIC

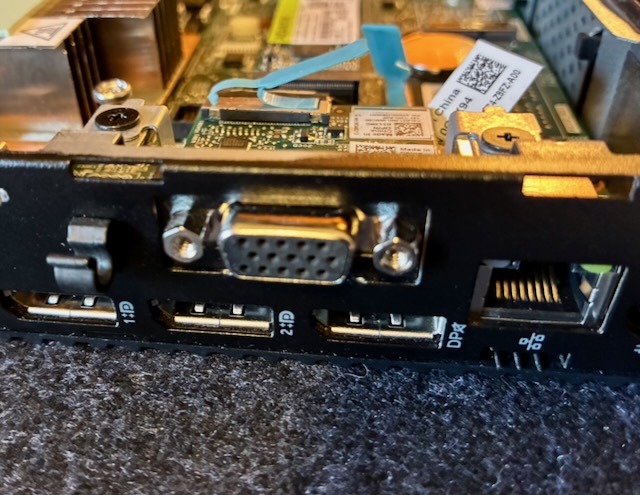
The plan was to leverage an existing flexible port opening on the Wyse chassis currently being occupied by a VGA port. The opening provides enough space for an ethernet port, but I would have to replace or modify the VGA adapter mounting hardware to make it work. Another option I had considered was 3D printing a bracket.

Dell Wyse Flex Port

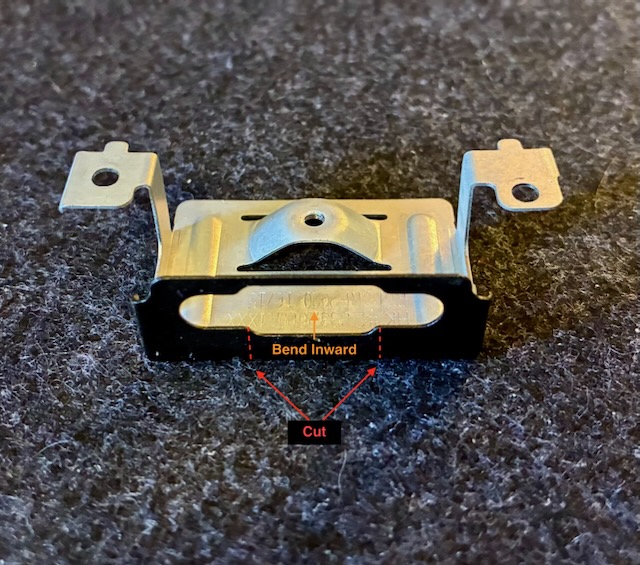
After taking some measurements and test fitment, the approach I landed on was modifying the VGA adapter bracket. As you can see in the picture below, all I had to do was make two small cuts at the bottom of the backplate, then bend the remaining table backward 90 degrees until it's flat. This gives enough room for the ethernet port hardware to fit in the square cutout. Also, the result appears relatively clean without much noticeable "hacking".

VGA Bracket Modification

For mounting the port, the supplied screws work sufficiently in the existing VGA port screw openings. While it's not a perfect fit, the screw heads are wide enough to sandwich the lower half of the bracket securing the unit tightly in place. As you can see below, I'm quite happy with the final installed fit.

Ethernet Port Installed

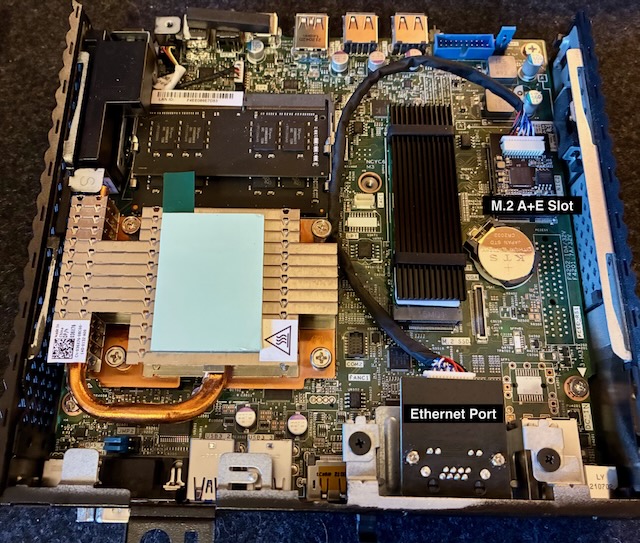
After the port is installed, the M.2 A+E card can be inserted in the opening on the motherboard. The adapter comes with a screw to attach the card to the M.2 mounting post. I routed the cable around the other M.2 slot housing the system SSD. In the picture below, you can see the final installed product along with some of the other upgrades I've made.

Adapter Installed Top View

And, another picture of the upgraded nodes installed back into my mini rack. I really love the Monoprice Snagless SlimRun cables. They are well-made, flexible, and small which is perfect for routing in tight spaces like this.

Adapter Installed Rack View

One last step after reassembling everything was to make sure the "Wireless Device" is set to enabled in the BIOS. If your Dell Wyse did not include Wifi hardware, chances are that this setting will be disabled (and non-functional) like mine. Once booted into Proxmox, the device was recognized and I changed the ethernet bridge use the 2.5 Gb NIC instead of the existing 1 Gig unit.

iperf3 2.5 Gbe speed test

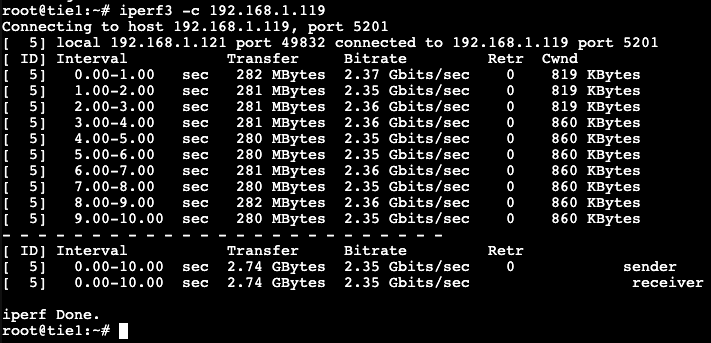
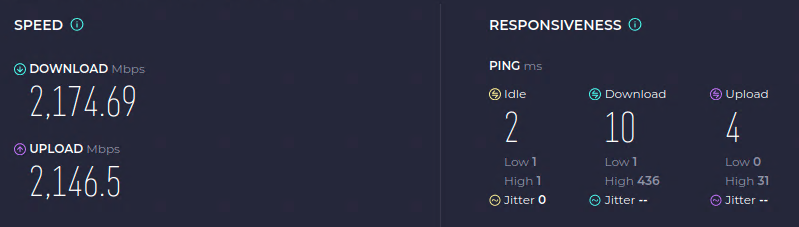
As you can see, the new NIC works pretty well and nearly saturates a 2.5 Gbe connection. I'm excited to start running workloads and normal operations on these units to see how they perform on real use cases.

Upgrading My WAN

ยท 3 min read

Heading into 2026 I started putting together my Homelab which means more self-hosting of various services. One concern that I had was egress bandwidth when my family is mobile or I am backing/syncing data to the cloud. Historically, we have had cable internet from Xfinity offering 300 Mb down and 50 Mb up speeds. That has served us well for the last 10+ years we have lived in our current home. But, the slower speeds may prove to be a bit of a challenge with some of the goals I had in mind. Also, even I wanted to upgrade our current plan, I would need to upgrade my modem hardware and still not the kind of upload speeds I was looking for. So, I started looking at what other options were on the table.

Our town has had a fiber optic backbone running through it for quite some time, but it was difficult for an average resident to get access without figuring out a last mile solution to get it to your home. Obviously, that's not really feasible for most. That all changed in the last year as a small regional company footed the bill to run fiber service through all neighborhoods in town. After this was complete, they opened for business and started offering symetrical speeds up to 8 Gb to residential customers. And, these speeds were faster and much cheaper than the cable or other options available in our area.

As we came into the end of 2025 I assumed any gremlins would have been worked out of the system, I decided to pull the trigger on a 2 Gb symetrical plan. An install was scheduled for the first with of January and the whole process seemed pretty organized. The tech and I went back and forth a bit on install options and locations, but we were able to successfully find a line routing and ONT mounting location that was suitable. Overall, the install is quite clean and close to my network equipment in the closet.

Nokia Fiber ONT

It's only been a couple weeks with the new service, but the speed and reliability have been great thus far. I have also paired this with some upgraded Unifi access points in our house so we can further take advantage of the new bandwith. I have also run more Cat 6A in our house for additional 2.5 Gbe (and 10 Gbe) wired connections so they can take advantage as well. I will cover more of this in a future update. I'm looking forward to continue building out my homelab and onboarding more services that will benefit from the bigger pipe.

Fiber Speed Test

New Web Site

ยท 3 min read

One of my goals for 2026 is to revamp my personal web site. I have maintained some form a web site for over two decades in various styles, formats, and efforts to keep it up to date. Historically, its been positioned more as a professional resume or depiction of my portfolio in pursuit of career opportunities. I don't necessarily want to lose that aspect of it, but my goals moving forward will be a little different.

The plan for the web site in its fifth(?) incarnation will be to now showcase more of my personal interests and hobbies. This is inline with another one of my goals heading into 2026 which is reignite my personal interest in technology. Having worked in IT for so long, like many, I found myself being bored or even jaded about technology. I think part of that is because you tend to repeat solving the same kinds of problems and learning new things is based on necessity, not curiosity. That wears on you over time and I'm hoping I can do a bit of a reset.

So, what can be expected with the new web site? My objectives are as follows:

  1. Share and document my technology hobbies and personal interests
  2. Keep the web site updated on a regular(ish) basis
  3. Maintain my resume and professional presence
  4. Have more fun ๐Ÿค 

In the spirit of documenting more of what I'm working on, I can start with the web site itself. My time is limited and I don't do lots of hands-on web development these days as an Enterprise Architect. A custom-built web site was quickly ruled out. Even my last version was built on a Jekyll theme. For the new site, I need to have some traditional web pages, a blog capability, and a way of documenting some of my hobbies. Furthermore, I knew I wanted to create and maintain most of the content in Markdown.

After a quick search, I stumbled upon Docusaurus, an open source project from Meta. Personally, I don't use any of Meta's commercial products, but I do respect their engineering and open source teams. React and their influence on the JavaScript ecosystem have become the de facto standard for nearly all modern web interfaces. Docusaurus provides a simple, easy-to-use, well-maintained, and highly-polished framework for building static documentation web sites. Within minutes, I can initialize a project, populate it with a directory structure and Markdown content, run a build, and deploy. You also have the opportunity to customize with React and Typescript components as necessary. For me, I've found its working quite well.

On the hosting front, I've moved from Netlify to Cloudflare Pages with a direct deploy from Github. I wasn't unhappy with Netlify, just more of a consolidation exercise since I also moved my domain and DNS there. And, I have been using the Cloudflare Developer Platform for some other personal projects and have found it pretty nice to use.

As for content, my first area of focus will be documenting my newly created Homelab. It's been a lot of fun and I'm learning a lot. Documenting the build will be part of the fun and it may help others along the way. Stay tuned for more...